Importing data into OpenRefine
Last updated on 2023-05-01 | Edit this page
Overview
Questions
- How do I get data into OpenRefine?
Objectives
- Successfully import data into OpenRefine
Importing data
OpenRefine does not manipulate your data directly. Instead, the data you import and all the changes you make are stored in a project. You can stop working on a project and continue later if you like. When you want to ‘refine’ a new file, you start by creating a new project. When you want to continue working on a project, you can open it through “Open Project”. It is also possible to export a project on one computer and continue working on it on a different computer. To do so, you transfer the exported files to the new computer and use “Import Project” on the new computer.
What kinds of data files can I import?
There are several options for getting your data set into OpenRefine. You can upload or import files in a variety of formats including:
- TSV (tab-separated values)
- CSV (comma-separated values)
- TXT
- Excel
- JSON (javascript object notation)
- XML (extensible markup language)
- Google Spreadsheet
Create your first OpenRefine project (using provided data)
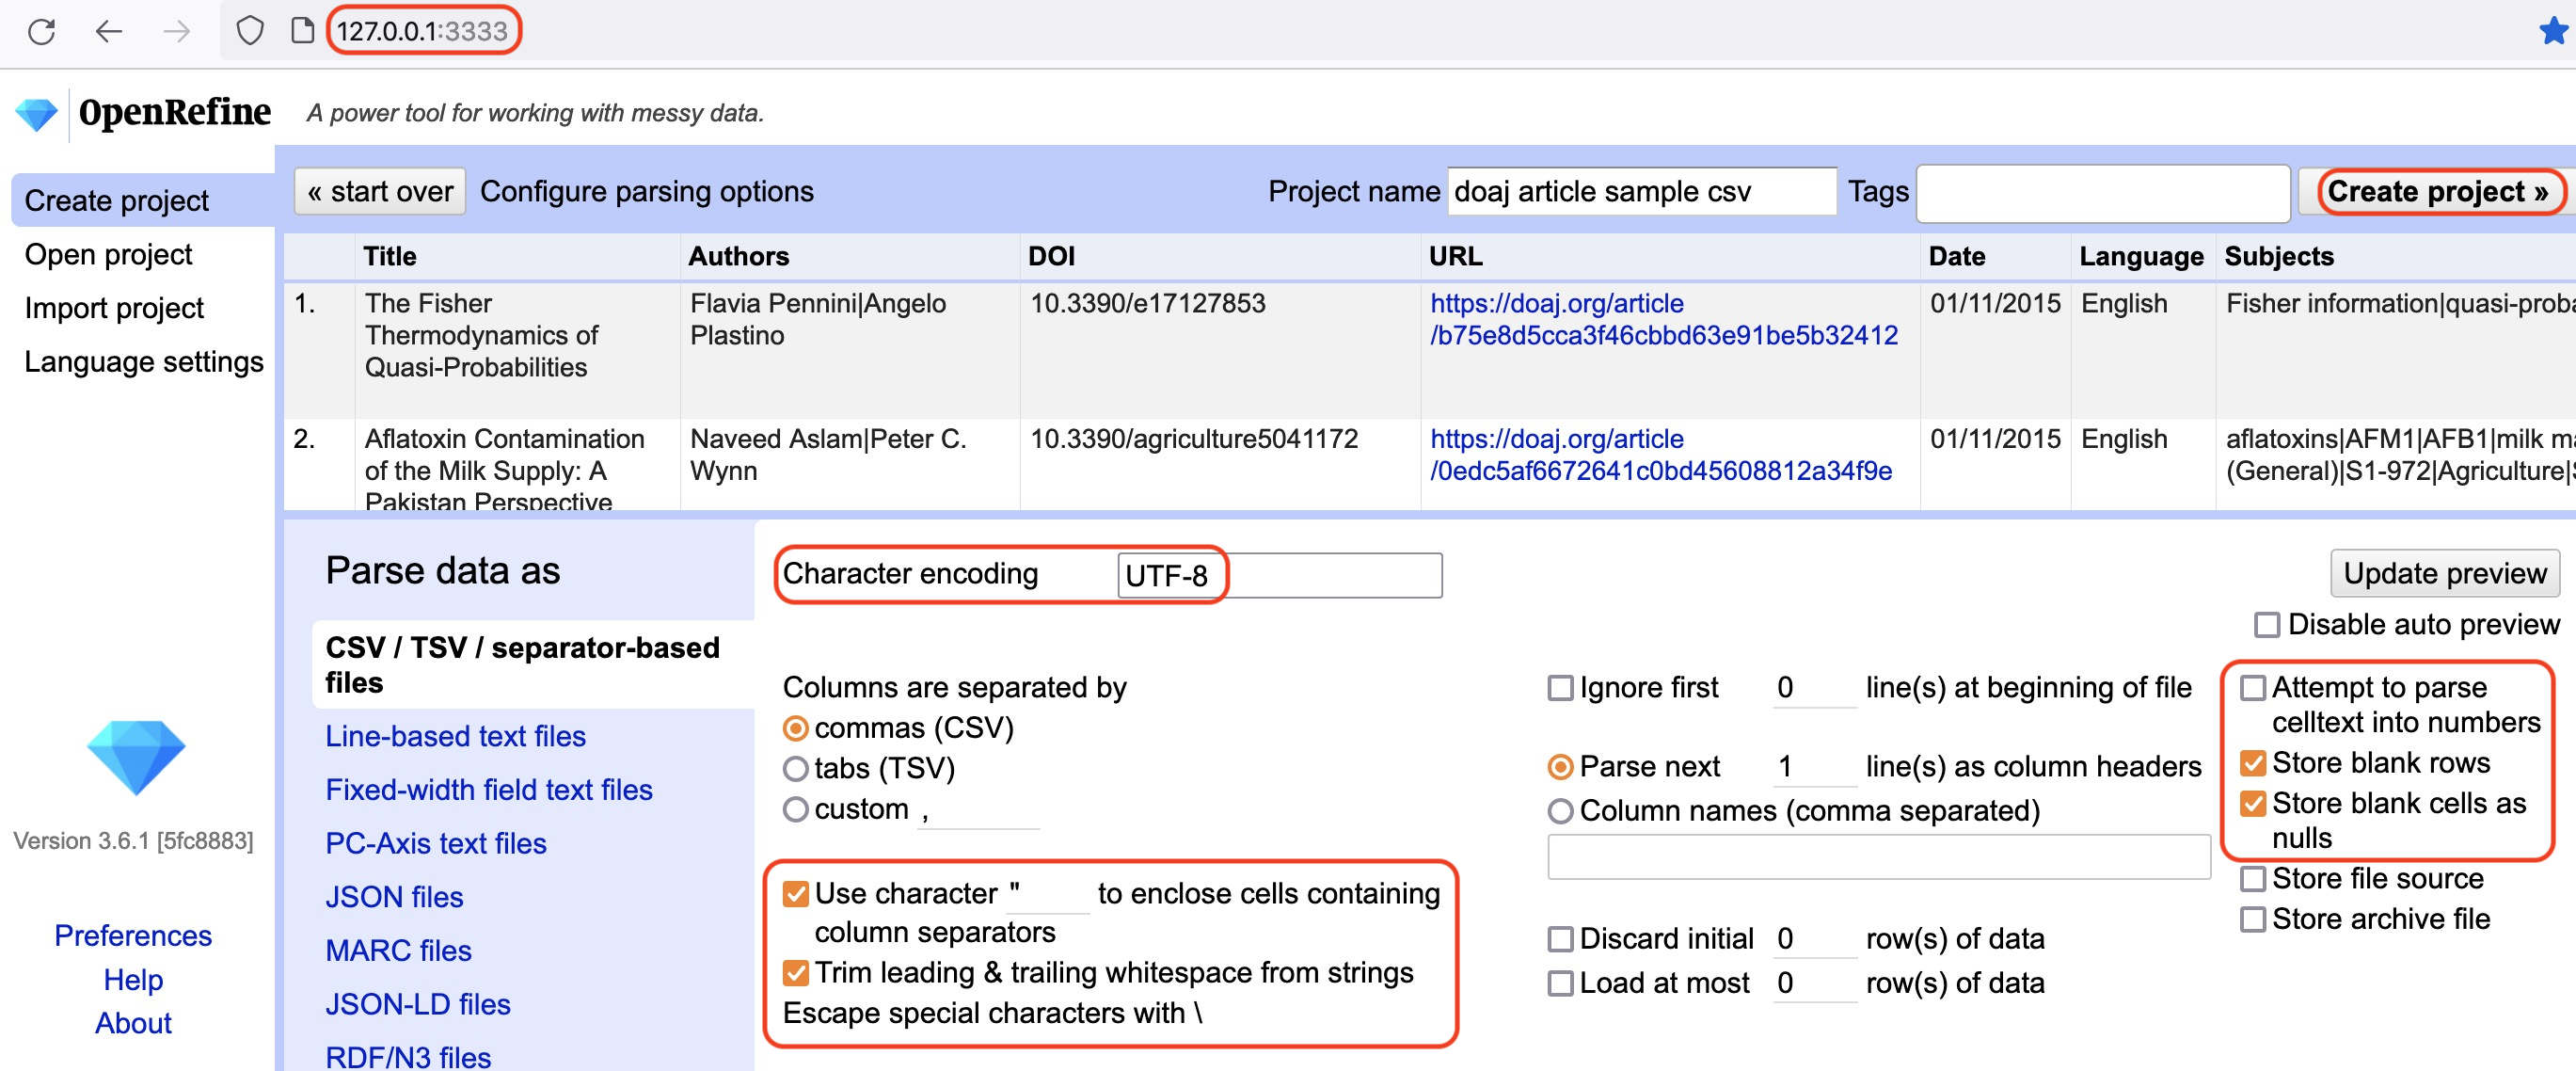
To import the data for the exercise below, follow the instructions in Setup to download the data and run OpenRefine. NOTE: If OpenRefine does not open in a browser window, open your browser and type the address http://127.0.0.1:3333/ to take you to the OpenRefine interface.
- Once OpenRefine is launched in your browser, click
Create Projectfrom the left hand menu and selectGet data from This Computer - Click
Choose Files(or ‘Browse’, depending on your setup) and locate the file which you have downloaded calleddoaj-article-sample.csv - Click
Next»where the next screen (see below) gives you options to ensure the data is imported into OpenRefine correctly. The options vary depending on the type of data you are importing. - Click in the
Character encodingbox and set it toUTF-8. This ensures that OpenRefine correctly interprets the imported data as UTF-8 encoded. If you don’t select this you may find that some special characters (e.g. smart quotation marks) are not displayed correctly. - Ensure the first row is used to create the column headings by
checking the box
Parse next 1 line(s) as column headers - OpenRefine will automatically select “Use character” to enclose cells containing column separators (such as a comma) as part of their data. This will make sure that OpenRefine doesn’t misinterpret any commas (or other characters) within the column data as a delimiter. Keep this option selected.
- From OpenRefine 3.4 onwards there is an option to Trim leading &
trailing whitespace from strings when importing separator-based files.
Keeping this checked will ensure that values like
EnglishandEnglish, which differ by a single trailing space, are not treated as different values after the import - Make sure the
Attempt to parse cell text into numbersbox is not checked, so OpenRefine doesn’t try to automatically detect numbers because this could cause errors such as confusion between date formats (e.g. DD/MM/YYYY vs MM/DD/YYYY). - The Project Name box in the upper right corner will default to the
title of your imported file. Click in the
Project Namebox to give your project a different name, if desired. - Once you have selected the appropriate options for your project,
click the
Create project »button at the top right of the screen. This will create the project and open it for you. Projects are saved as you work on them, there is no need to save copies as you go along.

To open an existing project in OpenRefine you can click
Open Project from the main OpenRefine screen (in the left
hand menu). When you click this, you will see a list of the existing
projects and can click on a project’s name to open it.
Going Further
- Look at the other options on the Import screen - try changing some of these options and see how that changes the Preview and how the data appears after import.
- Do you have access to JSON or XML data? If so the first stage of the import process will prompt you to select a ‘record path’ - that is the parts of the file that will form the data rows in the OpenRefine project.
Key Points
- Use the
Create Projectoption to import data - You can control how data imports using options on the import screen
- Several files types may be imported into OpenRefine.
